Pre Arming Checks
The following checklist consists of the last verifications that must be carried out just before ARMING, i.e, starts engine operation.
1. Check Number of Satellites
The number of satellites must be greater than 15.
2. Check Battery Level
A fully charged battery should show > 50 V in the GCS.
Charged voltage level 12S Battery:
- For a LiPo HV configuration, a fully charged battery has a voltage of 52.2v.
- For normal LiPo configuration, a fully charged battery has a voltage of 50.4v.
A fully charged 6S battery should show > 25.5v in the battery checker
Charged voltage level 6S Battery:
- For a LiPo HV configuration, a fully charged battery has a voltage of 25.2v.
- For normal LiPo configuration, a fully charged battery has a voltage of 26.1v.
3.Check Compass Orientation
Verify that drone forward position is consistent, by comparing the actual orientation of the drone with the orientation shown in the GCS.
You can rotate the heading clockwise or counterclockwise for easier inspection.
4.Check Flight Modes
Change the flight modes on the radio controller and verify that the changes are reflected in the GCS.
5.Check GPS Status LED
Status lights should be flashing green.
| LED MODE | MEANING | LED COLOR |
|---|---|---|
| Intermittent | Initializing | 🔵 🔴 |
| Intermittent | Failures in Pre-Arm checks | 🟡 ⚪ |
| Intermittent | Good GPS Fix | 🟢 ⚪ |
| Intermittent | Bad GPS Fix | 🔵 ⚪ |
| Solid | ARMED – GPS Fix | 🟢 |
| Solid | ARMED – No GPS Fix | 🔵 |
| Solid | Failsafe Mode (Radio/Battery) | 🟡 ⚪ |
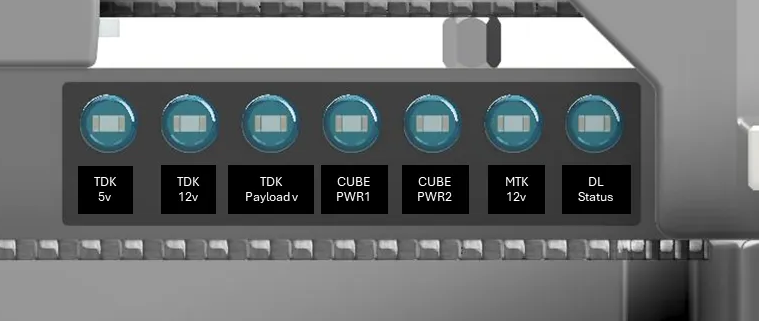
6. Check Hercules Panel LED
Located in the front of the drone.
-
All power LEDs should be ON.
-
The Doodle Labs status LED will blink if the connection is off, and remain solid when a link is established between the two radios. Only for Doodle Labs radio version.
7. Check signal on motors
If any motor is beeping, it indicates that it is not receiving a signal from the autopilot.
All motors should stop beeping once the drone has completed initialization.
8. Motors Check
-
Manually spin each motor to ensure they move freely.
-
Motors should not produce any noise that suggests loose internal parts.
-
Check for any possible gaps or openings in the motor casing.
There should be no visible movement.
9. Propellers-Motor Assembly
Ensure that the propeller brackets are securely fastened to the motors, with no visible gaps between them.
10. Propeller blade tighten
Check that the propeller blades are not loose. The propellers should have some resistance when rotating on the bracket.
Keep in mind that they may loosen over time with regular use.
11. Set Home Location
In Mission Planner, click the Home Location button located above the home location input fields.
This will set your home location to the current coordinates.
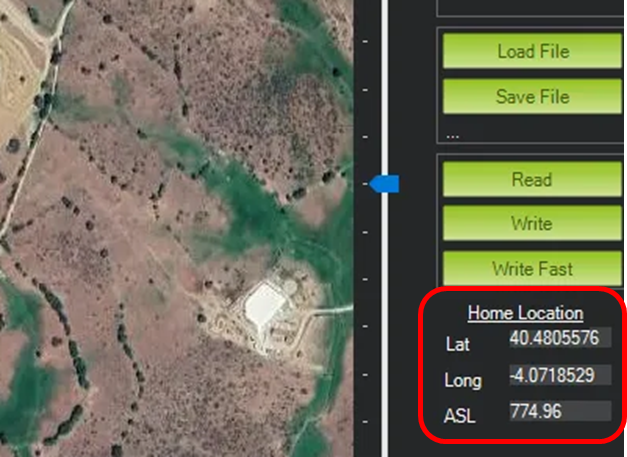
By default, the drone will set the home location to the coordinates where it was initially powered on.
12. RTL failsafe settings
Verify the RTL failsafe altitude and ensure that the aircraft will clear any obstacles in the operating area during an automatic RTL failsafe recovery by calculating the MOCA (Minimum Obstacle Clearance Altitude).
13. Battery failsafe settings
Ensure the correct Battery Capacity is set and the Low Voltage RTL.
warnings are set for your particular application, flight envelope & payload.
14. Check GCS battery level
Check that the laptop has enough battery for the entire flight.
15. Check Controller battery level
Check that the RC has enough battery for the entire flight.
16. Check messages in GCS
Verify that there are no errors in the overall system status, indicated on the GCS telemetry feed. Errors could include excessive RF noise, magnetic interference, GPS signal strength, IMU health.
17.
If the drone does not pass the PreARM checklist, you can check
18.
When the “Ready to arm” message is white and good, the drone is ready to take off.